
WinSPC timed data collection can reduce labor time associated with collecting data.
WinSPC has the ability to prompt a device to send a reading, or prompt the operator that a reading is required, at certain intervals or at specific times during Data Collection. This can free up the operator from having to prompt a device at scheduled times, or it can remind the operator that a reading is required. Use the following steps below to set up a collection plan to use timed data collection:
- Login to WinSPC as the Admin user or a user that has permissions to edit a Collection Plan.
- Open up the Collection Plan properties by using one of the following methods
- Double left click on the Collection Plan.
- Right click and select ‘Properties’ from the popup selection menu.
- Left click on the variable name to select it for the setup of Timed Data Collection within the ‘Item Name’ window on the ‘Step Options’ tab.
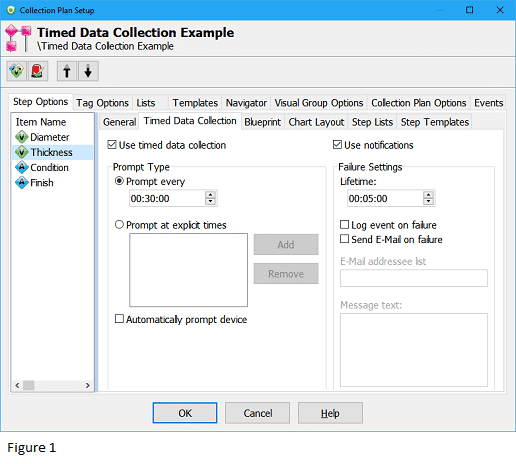
- Left click on the Timed Data Collection tab to display the Timed Data Collection setup screen. (Figure 1)
- Check the Use Timed Data Collection checkbox.
- Select a Prompt Type of Prompt every or Prompt at explicit times. See below about the different Prompt Types:
- Prompt every: Use this setting if you want the device, or operator, prompted at repeating intervals, such as every 30 minutes. Enter the desired interval in the selection box provided by specifying the number of hours, minutes and seconds of the interval. The format to use for this information is HH:MM: SS. (As an example, for an interval of 30 minutes, you would enter 00:30:00. Similarly, for an interval of 7 hours, 45 minutes and 5 seconds, you would enter 07:45:05). To do this:Select the appropriate time position that you wish to change (Hours, minutes, or seconds).
- Either type in the new value, or use the up-down arrows to increment-decrement the values respectively.
- Prompt Explicit times: Use this if you want the device prompted at explicit times–six o’clock in the morning or eleven thirty at night. To do this:
- Left click the Add button to open the Time Selection box. (Figure 2)
- Select the appropriate time position that you wish to change (Hours, minutes, or seconds).
- In the Time Selection box that appears, specify a time either typing in the new value or use the using
the up-down arrows to increment-decrement the values respectively. - Click the OK button on the Time Selection box to save and close.
- Repeat to add additional explicit times as desired.
- Prompt every: Use this setting if you want the device, or operator, prompted at repeating intervals, such as every 30 minutes. Enter the desired interval in the selection box provided by specifying the number of hours, minutes and seconds of the interval. The format to use for this information is HH:MM: SS. (As an example, for an interval of 30 minutes, you would enter 00:30:00. Similarly, for an interval of 7 hours, 45 minutes and 5 seconds, you would enter 07:45:05). To do this:Select the appropriate time position that you wish to change (Hours, minutes, or seconds).
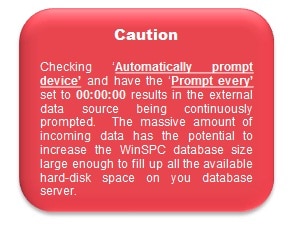
- If the variable is using a promptable device to collect data, and you would like it to prompt the device automatically, then check the Automatically prompt device checkbox. If this option is selected, you will not need to setup the Use Notification section and can skip to step 11.
- Check the Use Notifications checkbox if you want a popup notification to be displayed during Data Collection whenever a defined interval or explicit time passes without the appropriate data for the collection plan step being collected. It merely means that failure to collect data according to the specified timing will be indicated with a visible notification box.
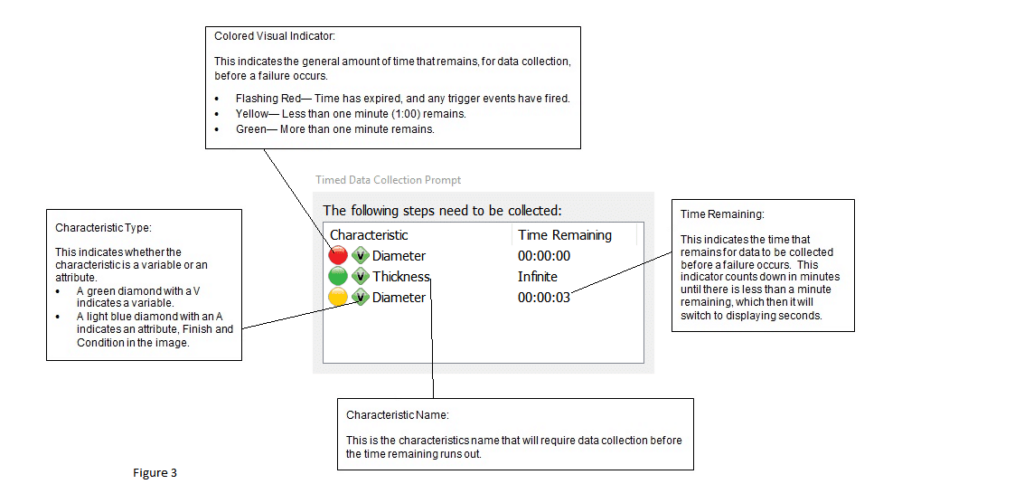
- Note: Once you collect data for a characteristic that is displayed in the notification box, that characteristic is removed from the prompt. If there is only one characteristic displayed in the prompt, the prompt itself disappears. Also, collecting data, as used here, means the collection of one value. It is not necessary to collect an entire subgroup or sample in order to prevent a failure event. See Figure 3 below for more information about the Notification box.


- In the At Lifetime selection box, specify the number of hours, minutes and seconds that may pass after a defined interval or explicit time is missed before classifying the timed data collection as failed. To indicate an unending lifetime, use a value of 00:00:00. To do this:
- Select the appropriate time position that you wish to change (Hours, minutes, or seconds).
- Type in the new value, or use the up-down arrows to increment-decrement the values respectively.
- Choose a trigger action, if desired, to take if a failure to collect data occurs.
- Log event on failure: Check the Log event on failure checkbox, if you want the failure to be logged in WinSPC’s event log.
- Send E-Mail on failure: Check the Send E-Mail on failure checkbox if you would like an e-mail sent when a failure occurs. Enter the recipients email addresses E-Mail addresses list text box. If you would like to send more than one email then separate the addresses by using a comma followed by the next recipient who you want to receive the e-mail. Type in the text you would like in the ‘Message text’ that will appear in the email that will be sent upon failure. This article assumes that WinSPC E-Mail has already been setup in the System Settings.
- Click the OK to close the setup dialog box. From this point forward, whenever the collection plan is loaded for Data Collection, the timed data collection prompting you specified using this procedure will be executed.
Fact Checked & Editorial Guidelines
Our Fact Checking Process
We prioritize accuracy and integrity in our content. Here's how we maintain high standards:- Expert Review: All articles are reviewed by subject matter experts.
- Source Validation: Information is backed by credible, up-to-date sources.
- Transparency: We clearly cite references and disclose potential conflicts.
Reviewed by: Subject Matter Experts
Our Review Board
Our content is carefully reviewed by experienced professionals to ensure accuracy and relevance.- Qualified Experts: Each article is assessed by specialists with field-specific knowledge.
- Up-to-date Insights: We incorporate the latest research, trends, and standards.
- Commitment to Quality: Reviewers ensure clarity, correctness, and completeness.